Tampilkan postingan dengan label COMPIE. Tampilkan semua postingan

Selasa, 27 Januari 2009

NVIDIA 9800 GT 512MB 256-bit GDDR3

PRESENTA.....

XFX PVT98GYDLU GeForce 9800 GT 512MB 256-bit GDDR3

Model
Brand PNY
Model VCG98GX2XPB-OC
Interface
Interface PCI Express 2.0 x16
Chipset
Chipset Manufacturer NVIDIA
GPU GeForce 9800 GX2
Core clock 675MHz
Stream Processors 256 (128 x 2)
Memory
Memory Clock 2100MHz
Memory Size 1GB
Memory Interface 512-bit
Memory Type GDDR3
3D API
DirectX DirectX 10
OpenGL OpenGL 2.1
Ports
HDMI 1
DVI 2
General
RAMDAC 400 MHz
Max Resolution 2560 x 1600
SLI Supported Yes
Cooler With Fan
Power Connector 6 pin / 8 pin
Dual-Link DVI Supported Yes
HDCP Ready Yes
Packaging
Package Contents VCG98GX2XPB-OC
Driver Disk
User's Manual
Power Cable
DVI to VGA/D-sub Adapter
S/PDIF Cable


NVIDIA HybridPower
HybridPower? unleashes graphics performance when needed and switches to quiet, low-power quiet operation for everyday computing. Plug any NVIDIA Hybrid SLI-enabled GPU into any NVIDIA Hybrid SLI-enabled motherboard for the ultimate control. Dial up performance for demanding 3D games and applications; reduce noise and power consumption for everyday computing tasks like browsing the Web, word processing, or watching HD videos.

NVIDIA Unified Architecture
Fully unified shader core dynamically allocates processing power to geometry, vertex, physics, or pixel shading operations, delivering an incredibly true-to-life 3D graphics.

NVIDIA Lumenex? Engine
Support for 128-bit and 64-bit floating point HDR with up to 16x anti-aliasing delivering vividly realistic lighting effects while obliterating ?jaggies?.

Microsoft DirectX 10 Geometry Shaders
Dynamic geometry creation smoothes surfaces and enables incredibly detailed environments, shadows, and effects.

NVIDIA Quantum Effects? Technology
Advanced shader processors architected for physics computation deliver amazing performance and visual effects such as smoke, fire, and explosions.

Shader Model 4.0 Technology
Get your box geared up for the future of games with blazing fast shader performance and watch your characters sweat with Shader Model 4.0.

NVIDIA PureVideo HD Technology
Available on HD DVDs and Blu-ray discs, high-definition movies are bringing an exciting new video experience to PC users. NVIDIA® PureVideo? HD technology lets you enjoy cinematic-quality HD DVD and Blu-ray movies with low CPU utilization and power consumption, allowing higher quality movie playback and picture clarity.

HDMI Support
HDMI (High-Definition Multimedia Interface) is the first and only industry-supported, uncompressed, all-digital audio/video interface. By delivering crystal-clear, all-digital audio and video via a single cable, HDMI dramatically simplifies cabling and helps provide consumers with the highest-quality home theater experience. Built-in HDMI with multi-channel 5.1 surround audio.

High Dynamic Range (HDR)
High dynamic-range(HDR) lighting effects bring environments to life for a truly immersive experience. It takes advantage of the subtle light, texture, and color intricacies to create incredibly realistic environments.

Blu-Ray and HD DVD Support
Features hardware HD video processing and HDMI with built-in 5.1 surround audio technology delivers sharp images and vibrant color fidelity from 1080p playback of Blu-ray? and HD DVDs movies.

Windows Vista Certified
Have confidence that Certified for Windows Vista products will provide superior experiences with your videos running the Windows Vista operating system.That's because only Certified for Windows Vista devices have undergone Microsoft compatibility tests for ease-of-use, better performance and enhanced security.

PCI Express 2.0 Support
PCI Express Base 2.0 specification doubles the interconnect bit rate from 2.5 GT/s to 5 GT/s in a seamless and compatible manner. The performance boost to 5 GT/s is by far the most important feature of the PCI Express 2.0 specifications. It effectively increases the aggregate bandwidth of a 16-lane link to approximately 16 GB/s. The higher bandwidth will allow product designers to implement narrower interconnect links to achieve high performance. (backwards compatible with PCI Express)

Features

  • NVIDIA HybridPower? Technology
    HybridPower technology lets you switch from the GeForce 9800 GT graphics card to the motherboard GeForce GPU when running non graphicallyintensive applications for a silent, low power PC experience.
  • Dynamic Contrast Enhancement & Color Stretch
    Provides post-processing and optimization of High Definition movies on a scene-by-scene basis for spectacular picture clarity.
  • Enthusiast System Architecture
    The new ESA-enabled NVIDIA control panel provides a state-of-the-art interface for performance tuning and monitoring of your GeForce 9800 GT-based graphics card on NVIDIA nForce 790i platforms.
  • GigaThread? Technology
    Massively multi-threaded architecture supports thousands of independent, simultaneous threads, providing extreme processing efficiency in advanced, next generation shader programs.
  • NVIDIA® Lumenex? Engine
    Delivers stunning image quality and floating point accuracy at ultra-fast frame rates.
  • NVIDIA® Quantum Effects? Technology
    Advanced shader processors architected for physics computation enable a new level of physics effects to be simulated and rendered on the GPU?all while freeing the CPU to run the game engine and artificial intelligence (AI).
  • NVIDIA® Unified Architecture
    Fully unified shader core dynamically allocates processing power to geometry, vertex, physics, or pixel shading operations, delivering up to 2x the gaming performance of prior generation GPUs.
  • HDMI Output
    An integrated HDMI? connector allows you to send both high-definition video and audio signals to your HDTV via a single cable.
  • Dual-link HDCP Capable
    Designed to meet the output protection management (HDCP) and security specifications of the Blu-ray Disc and HD DVD formats, allowing the playback of encrypted movie content on PCs when connected to HDCP-compliant displays.
  • PCI Express 2.0 Support
    Designed for the new PCI Express 2.0 bus architecture offering the highest data transfer speeds for the most bandwidth-hungry games and 3D applications, while maintaining backwards compatibility with existing PCI Express motherboards for the broadest support.

Minimum System Requirements

  • Intel or AMD compatible motherboard
  • At least 512MB system RAM
  • PCI Express or PCI Express 2.0 compliant motherboard with one x16 graphics slot
  • One 8-pin and one 6-pin supplementary PCI Express power connectors
  • Minimum 580W or greater system power supply (with a minimum 12V current rating of 40A)*
  • 50 MB of available hard drive space
  • CD-ROM or DVD-ROM drive
  • Microsoft Windows 2000, XP, or Vista
  • VGA or DVI-I compatible monitor

ASUS RAMPAGE XTREME

[Computex08] RoG X48/P45 boards at ASUS

[Computex08] RoG X48/P45 boards at ASUS

Author: Marc Mouthaan

Publication: 06/05/2008 4:56 PM

News type: Product news

Views: 12489

ASUS showed two new Republic of Gamers motherboards on its stand. The Rampage Extreme is the new topmodel, based on Intel's X48 chipset, combined with DDR3 memory. The Maximus II Formula is the RoG board with P45 chipset. Both should be available soon. A quick glance at the pictures show that ASUS has drastically changed the design of its high-end board to enhance the looks. Since nice looks aren't everything, ASUS has added some interesting new features to these boards.

Both the Maximus II and the Rampage feature a 16-phase power design for the CPU. ASUS has chosen a 3-phase power solution for the chipset and the memory modules have a 2-phase design. This should keep the boards stable even under extremely high voltages. We're not done yet though: both boards have an external display which shows things like clockspeed and voltages. In both cases the heatpipe cooling is done passively, with optional fans bundled to place on the heatsinks. The Rampage Extreme also has a water cooling block for the north bridge. ASUS has been clever enough to allow this block to be removed with only two screws, making it possible to remove and replace it with any other northbridge block.

Also handy is the presence of two BIOS chips on both boards. They aren't just there to have a backup of the BIOS in case a flash fails: ASUS also offers the possibility to flash two seperate BIOSes, for example, one stable and one beta version, which can be switched between using a jumper.

The X48 board takes it even further. This one features an enormous Fujitsu 1000 uF capacitors beneath the CPU-socket and next to the memory modules to increase the stability with high voltages. We find a few buttons and some sort of miniature joystick to the far left of the Rampage board, this allows use to configure while overclocking/benchmarking. OC'ers that wish to adjust the voltage during the benchmark will no longer have to solder their own potentiometers to the board.

ASUS claims that both boards, obviously dependant on the processor, are able to reach an FSB of over 600 MHz. Apparently they have reached DDR2 speeds of over 1400 MHz on their Maximus II Formula. The Rampage Extreme has reached DDR3 speeds of over 2100 MHz.

The new RoG boards should be available by mid-July.


ASUS Rampage Extreme (Intel X48 / DDR3)


On the fly adjusting of frequencies or voltages on the Rampage Extreme.


ASUS Maximus II Formula (Intel P45 / DDR2)

HOW TO MAKE ICON ON FD

Cara Mudah Mengganti iCon Flash Disk

FlashDisk /UFD saat ini merupakan benda personal yang dimiliki banyak orang khususnya kaum mobile.biasanya mereka menggunakannya untuk menyimpan data pekerjaan, file penting atau lainnya.oleh sebab itu flash disk sangat pentiing keberadaannya. Karena flash disk sering digunakan, boleh lah kita memberi polesan agar tidak terlihat membosankan.

kali ini kita akan mengganti icon pada flash disk. coba anda hubungkan flash disk anda ke konektor usb,setelah autorun, di explorer akan muncul icon removable disk standar yang diberikan windows (kelihatannya terlalu standar).

kita bisa merubah nya loh dari icon standar menjadi icon lain atau dengan foto kita, pertama-tama yang perlu disiapkan adalah 1 buah icon (gambar yang berekstensi *.ico) jika anda tidak mempunyai file icon anda bisa membuatnya menggunakan program gratisan "icoFX"

1.Jalankan Note Pad
2.ketikkan skrip di bawah ini

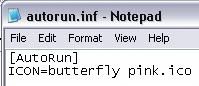
[autorun]
icon=nama file icon ,0

contoh:


3.simpan kedalam flash disk,tapi jangan didalam folder, dan simpan dengan nama autorun.inf
4.eject flash disk anda,cabut dari konektor dan sambungkan kembali ke konektor usb
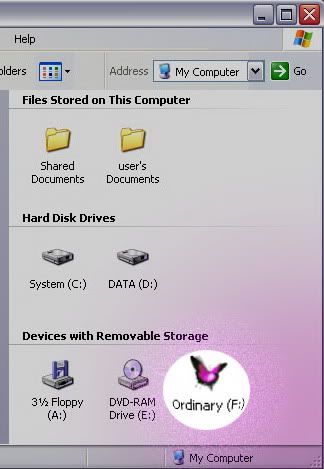
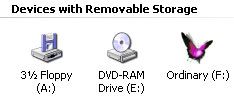
Apa hasilnya? coba buka My Komputer, Icon yang telah anda siapkan menjadi icon flash disk pada urutan removable disk.


Sebenernya mengganti Icon flash disk itu ada gunanya loh,apa ya kira-kira?:
1.pembuatan icon ini dimaksudkan untuk memberi identitas siapa pemilik flash disk tersebut (karena menggunakan icon foto si pemilik UFD)
2.untuk memberitahu apakah flash disk anda terkena virus (autorun),
3.kenapa harus disimpan didalam flashdisk,kenapa bukan didalam folder? ,karena biasa nya virus autorun membuat file autorun untuk menjalankan virus, jika icon anda tidak muncul di explorer kemungkinan besar flash disk anda terkena virus autorun.karena file autorun.inf yang sudah kita buat sudah di-rewrite oleh virus dengan nama yang sama tapi diganti dengan skrip yang berbeda,biasanya skrip ini mengarah pada induk virus.Dan jika kita klik pada my komputer virus itu akan berjalan dan melakukan tugasnya.

Membuat Anti Virus AutoRun dari Flash Disk

PCMAV_AutoRun_USB.jpg

Jengkel dengan Virus yang otomatis menginfeksi Flash Disk Anda saat Anda colokkan USB Flash Disk Anda ke port komputer yang terinfeksi virus?
Bagaimana tidak kita akali saja dengan Membuat Anti Virus AutoRun dari USB Removable Drive semacam Flash Disk?
Seringkali Virus akan membuat file “autorun.inf” yang ber-attribute file hidden dan system (dan/atau bisa juga termasuk file virus/trojan - server) begitu Anda memasangkan Flask Disk yang dijadikan target penginfeksian virus ataupun target pengintipan aktivitas user atau pencurian data user dengan Trojan.
file autorun.inf inilah command atau pemicu tereksekusinya file induk dan library virus/trojan yang sudah bersarang di komputer lokal atau jaringan tempat Flash Disk Anda berinteraksi dan berhubungan langsung.

Bila Anda pengguna OS Windows, seperti kita ketahui, Versi Windows sebelum generasi Windows Vista (termasuk Windows Windows XP), secara default tidak mengijinkan proses “AutoRun” executable files dari media USB Removable Drives seperti External Hardisk ataupun Flash Drive/Flash Disk (kecuali dari media cakram digital) yang kemungkinan besar ditujukan untuk kepentingan keamanan. Windows hanya mengijinkan proses “AutoPlay” media saja seperti AutoPlay Movie/Music dari DVD atau command seperti Open/View file melalui windows explorernya.
Untungnya (dari faktor kemudahan) sekaligus sayangnya (dari faktor keamanan), Windows Vista secara default telah memperkenankan proses “AutoRun” dilangsungkan dengan dafault opsi yang bisa Anda pilih secara permanen.

Lalu bagaimana mengakali Windows XP agar bisa mengijinkan proses “AutoRun” executable files dari removable drives seperti External Hardisk maupun Flash Disk?
Di bawah ini Penulis sampaikan teknis pembuatan AutoRun AntiVirus pada Flash Disk.

LANGKAH I - Download ANtiVirus yang bersifat Portable
Kenapa harus Portable? Karena tujuan dari pembuatan AutoRun File dari Flash juga bersifat portable, jadi program rujukan, dalam hal ini Anti Virus, bisa dijalankan langsung dari Flash Drive tanpa diperlukan instalasi.
Anda bisa menggunakan ANSAV (Ansav.exe - jangan ANSAV Security Guard) atau PCMAV (PCMAV-CLN.EXE - Jangan PCMAV-RTP.EXE)
Masukkan file Anti Virus Portable (plus file library pendukungnya - bila ada) tersebut ke dalam Flash Disk Anda. Dalam contoh kali ini, untuk mempermudah, letakkan saja di Root Flash Disk Anda tanpa perlu Anda masukkan ke dalam folder.

LANGKAH II - Pembuatan AutoRun Dari Flash Disk
Ada 2 (dua) opsi yang bisa Anda pilih:

  1. Menggunakan bantuan software orang lain, atau
  2. Menggunakan bantuan tangan Anda sendiri

1. Menggunakan bantuan software orang lain
Nomor ini tidak akan menjadi bahan pembicaraan inti pada Artikel ini.
Namun bila Anda menghendaki, Penulis merekomendasikan Anda untuk menggunakan aplikasi bernama APO USB AutoRun yang sangat bagus dan berkualitas, berfungsi dengan baik pada Windows XP SP2, berukuran file kecil, dan gratis lagi.
APO AutoRun USB akan membuat service bernama autorunusb.exe yang berjalan di background sebagai detektor yang bertugas memindai file autorun.inf pada root removable drive dan mendeteksi semua executable files pada media removable drive serta akan mencocokkan executable files tersebut dengan file name dan path file yang dirujuk oleh file autorun.inf tersebut.
Yang penulis heran dari software ini, APO tetap akan melakukan scan pada seluruh executable files yang ada pada media removable drives.
Namun, walau efeknya sedikit memperlambat kinerja komputer, proses scanning tersebut Penulis cermati dan rasakan sangat bermanfaat juga untuk memindai keberadaan Virus pada Removable Drives yang belum sempat terdeteksi oleh AntiVirus yang aktif di komputer. Begitu proses scanning menemukan suatu executable files atau script yang dianggap sebagai malware oleh AntiVirus tersebut, maka akan memicu (trigger) notifikasi dari AntiVirus bahwa telah ditemukan threat (virus).
Sayangnya APO AutoRun USB harus Anda install dulu sebelum Anda bisa mengaplikasikan AutoRun dari flash disk. Untungnya APO AutoRun USB juga telah menyertakan instalasi untuk keperluan portable plus autorun.inf builder.

2. Menggunakan bantuan tangan Anda sendiri
Teknik yang bisa Anda lakukan adalah pertama-tama dengan sedikit mengubah struktur HEX pada Windows Registry.

Bila sebelumnya atau secara default Windows tidak mengijinkan proses “AutoRun” dari USB Flash Disk, maka Registry-nya seperti ini:

Windows Registry Editor Version 5.00

[HKEY_CURRENT_USER\Software\Microsoft\Windows\CurrentVersion\Policies\Explorer]
“NoDriveTypeAutoRun”=dword:00000095

Agar Windows bisa mengijinkan proses “AutoRun” dari USB Flash Disk, maka ubah Registrynya menjadi:

Windows Registry Editor Version 5.00

[HKEY_CURRENT_USER\Software\Microsoft\Windows\CurrentVersion\Policies\Explorer]
“NoDriveTypeAutoRun”=dword:00000091

Anda bisa mengCopy Registry Lines tersebut, lalu Anda simpan sebagai (misal): “AutoRun_Removable_Media_Enable.reg” untuk Anda Klik kanan dan Merge (gabungkan) dengan Windows Registry Database.

Setelah Anda berhasil memasukkan Registry Entry Files ke dalam Windows Registry Database, maka pekerjaan Anda yang terakhir adalah membuat file “autorun.inf” yang berfungsi sebagai Command dengan rujukan ke File Anti Virus yang telah Anda download dan masukkan ke dalam Flash Disk Anda (pada Langkah I)
Dalam contoh ini, Penulis menggunakan PC Media Anti Virus PCMAV-CLN.EXE yang filenamenya telah Penulis ubah menjadi PCM4V-CL34N32.EXE guna menghindari pendeteksian Virus yang dimungkinkan akan memblokir PCMAV-CLN.EXE.
Maka file “autorun.inf” PCMAV menjadi seperti ini:

PC Media Anti Virus
[AutoRun]
open=PCM4V-CL34N32.EXE
icon=PCMAV.ICO
shellexecute=PCM4V-CL34N32.EXE
shell\Scan Virus\command=PCM4V-CL34N32.EXE
shell=Scan Virus

Salin baris-baris INF tersebut, dan simpan sebagai .INF file dengan nama “autorun.inf” (tanpa tanda kutip), kemudian letakkan file “autorun.inf” tersebut pada Root Flash Disk Anda.

KETERANGAN

  • Untuk file ICON dari PCMAV, Penulis extract dari file PCMAV-CLN.EXE, yang mana ICON file tersebut juga ditempatkan pada Root Flash Disk. Anda bisa menghilangkan/menghapus baris “icon=PCMAV.ICO” yang digunakan untuk memunculkan ICON File PCMAV sebagai Icon penanda Flash Disk seperti pada screenshot di atas. Baris rujukan ICON ini tidak mempengaruhi proses AutoRun. Namun bila Anda menginginkan PCMAV ICON tersebut, Anda bisa mendownloadnya dengan klik link ini.
  • Baris-baris INF tersebut bisa Anda modifikasi sesuai selera tulisan Anda, yang penting path file Anda tidak salah; file tujuan Anda rujuk secara relatif.
  • Jangan Lupa, untuk menghindari terhapusnya file dengan begitu mudahnya, sebaiknya sembunyikan saja File Anti Virus berserta library file pendukungnya (bila ada) maupun file “autorun.inf”nya dengan mengeset File Attributnya dengan “hidden” dan bila perlu “system”. Satu rekomendasikan lagi, alangkah baiknya, semua File tersebut Set File Attributenya menjadi “Read Only” agar, secara sederhana, tidak bisa termodifikasi.
Untuk keperluan setting modifikasi File Attribute terbut Anda bisa melakukannya dengan Select All files yang akan disembunyikan, lalu klik kanan file-file tersebut, pilik dan klik “properties”, dan beri tanda centang pada check box “hidden. Sedang untuk set menjadi “system”, Anda bisa menggunakan Windows ATTRIB.EXE di lingkungan kerja DOS atau Anda bisa juga menggunakan Attribute Changer yang berlingkungan kerja GUI. Q = Lho, katanya ga pake tool ya? A = untuk mudahnya, gunakan Attribute Changer bila ATTRIB.EXE dirusak/dihapus Virus/Admin dan Anda malas untuk extract dari Windows CAB.
--P-impUlz--

INSTALLING THE VGA CARD

Video Card Upgrade Install Guide

Installing The Standard VGA Driver

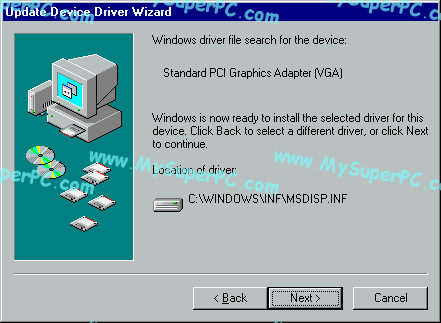
The window changes to look like this to indicate that Windows is ready to install the driver. Click on the "Next" button.
Update device driver wizard with GeForce2 Pro still installed


The window changes to look like this to announce that Windows has installed the driver. Windows has not really installed the driver yet. It's got the computer set up to do the install. Click on the "Finish" button.
Update device driver wizard with GeForce2 Pro still installed


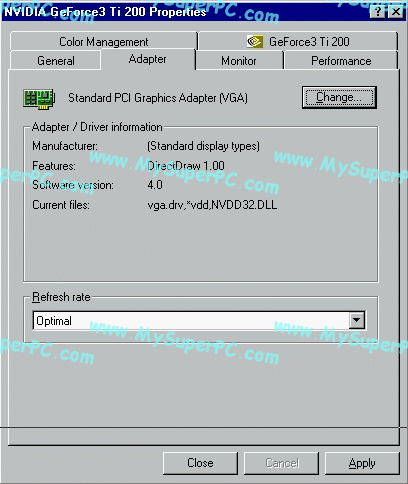
Click on the "Apply" button.
Update device driver wizard with GeForce3 Ti 200 still installed


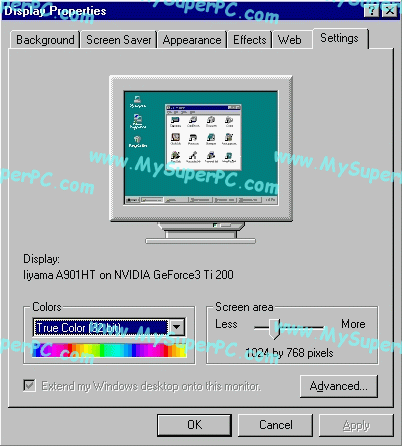
Click on the "Close" button.
Display Properties with GeForce3 Ti 200 still installed


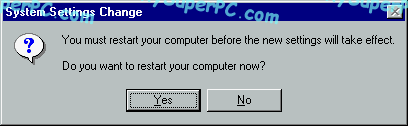
Click on the "Yes" button and the computer will restart to actually, really install the selected drivers.
Update device driver wizard with GeForce2 Pro still installed


The screen goes black and the message "Windows is now restarting..." is displayed. If, during this reboot, the Hardware Wizard gives a message to the effect that new hardware has been detected and prompts to install the drivers then once again select the "Standard PCI Graphics Adapter (VGA)". When the computer boots back to the desktop, the colors and the display probably look very different than they did before. That's because the computer is now using the standard VGA adapter, which is very basic. Let GoBack settle down.

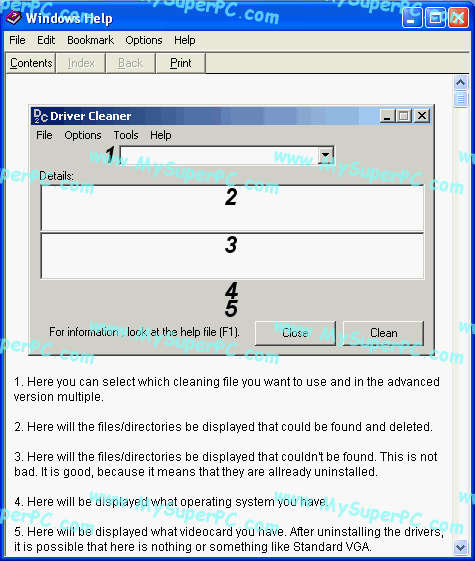
For replacing an NVIDIA based video card like I did, read the Driver Cleaner ReadMe file and follow the steps. There are not many steps and the step are not difficult, but there's no point in repeating them here. On the other hand, I found the text shown below from the Driver Cleaner help file quite helpful, so I've mentioned it here to make sure you see it. Execute Driver Cleaner to remove any remaining remnants of the NVIDIA video card drivers. The steps for Driver Cleaner require that the computer be restarted in "Safe Mode". See this How to Start a Windows 98-Based Computer in Safe Mode article from Microsoft if you're not sure how to do that. If, during the reboot, the Hardware Wizard gives a message to the effect that new hardware has been detected and prompts to install the drivers then once again select the "Standard PCI Graphics Adapter (VGA)".
How to use DriverCleaner


For replacing an ATI based video card, execute CATALYST Uninstaller (cat-uninstaller.exe). Follow the prompts and restart the computer when prompted. If, during the reboot, the Hardware Wizard gives a message to the effect that new hardware has been detected and prompts to install the drivers then once again select the "Standard PCI Graphics Adapter (VGA)".

With the appropriate driver cleaner utitlity complete, if you used the System Configuration Utility to reach Safe Mode as the article describes (and like I did) then now is a fine to use it again to disable the startup menu since you'll no longer need the option of starting in Safe Mode.

If you're upgrading from an integrated graphics chipset, meaning a chipset built-into the motherboard, so that there is currently no video card in your computer then it's worth noting that some motherboards require a simple BIOS change in order for the installed video card to be recognized. Consult the documentation that came with your motherboard or computer for more information.